


How To Create Interactive Tabs using Astro and Alpine
Effortlessly enhance your websites with interactive tabs, subtle and smooth transitions using Astro and Alpine.js


Dusts off blog 😶🌫️
Oh hey there 👋🏼
Glad you can make it to my article. Today's journey involves implementing interactive tabs that can be used wherever your imagination takes you! In my case, I've implemented it to showcase my projects on my portfolio.
Huge shoutout to Michael Andreuzza and his article over making an interactive testimonial with Astro and Alpinejs. It helped me understand what was going on and lay out a starting point for my use case.
It's been a while since my first article. Looking to start out as little as writing at least 1 per month and stay the most consistent possible!
Hopefully you can find something useful out of this one!
Intro
In the modern web development landscape, creating interactive and user-friendly interfaces is crucial. This will ultimately determine your visitor's experience with your website or application.
If you're like me, you love bringing ideas to life and seeing them input some kind of value and bring awesome user experience through them.
Here's a preview of the final result:
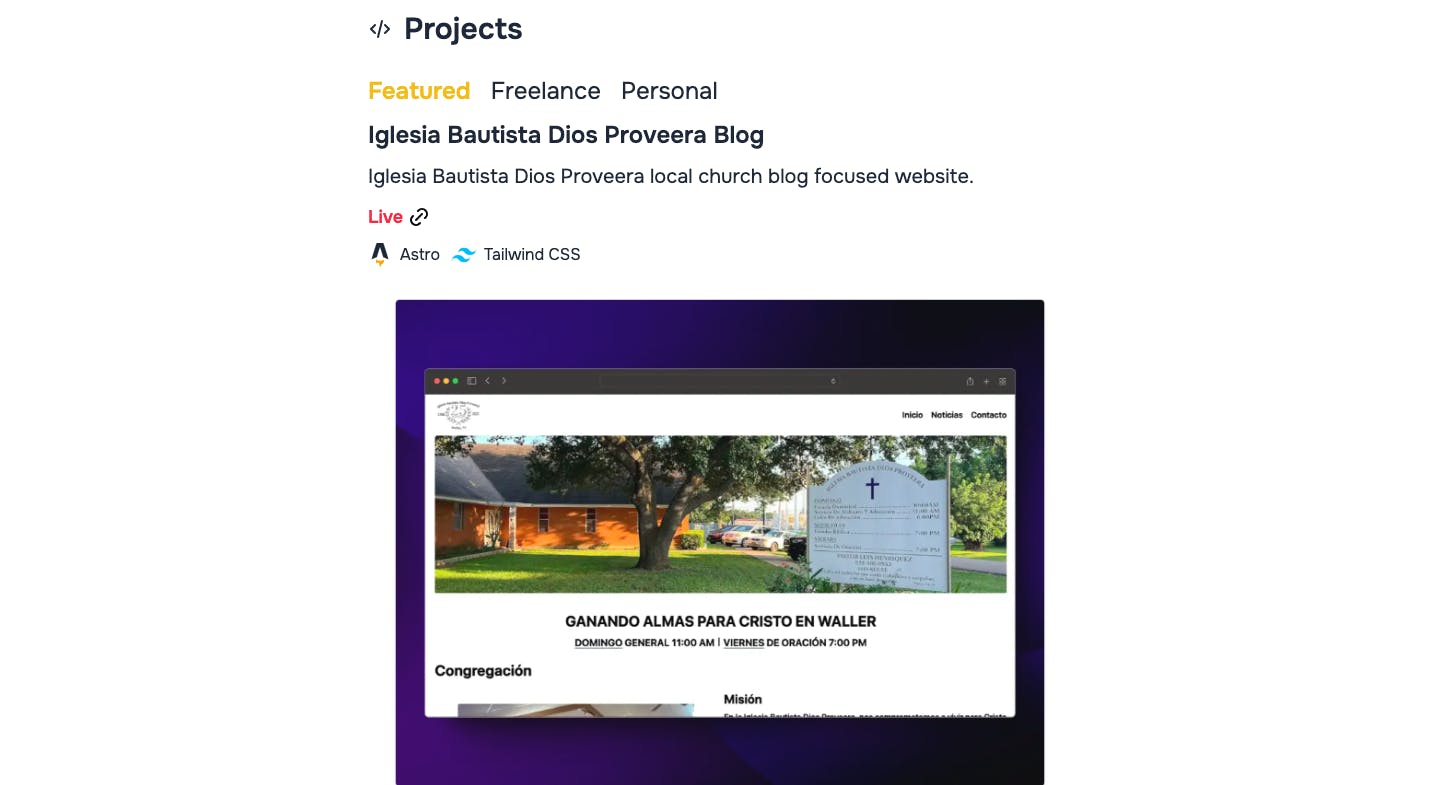
You can also see it in action in my portfolio's Project section.
Foundations
Before we get into the fun part, let's briefly go over the tools we will be using and go on from there!
Astro: a static site generator focused on performance and is particularly well-suited for content-heavy websites such as landing pages, blogs, and technical documentation. Astro's architecture is HTML-first, meaning it outputs zero JavaScript by default, and supports both static site generation (SSG) and server-side rendering (SSR)
Alpinejs: a lightweight JavaScript framework designed for adding interactivity to web pages without the need for a build process or bundler
Tailwind CSS: utility-first CSS framework designed to enable developers to build custom user interfaces more efficiently. Provides a set of pre-designed utility classes that allow for rapid styling without the need to write custom CSS
Implementation
Since this is not a step by step guide for setting up an Astro project, we will be focusing exclusively on building out the tabs functionality.
You can get started quickly using Astro's amazing docs. Astro also provides an easy way of integrating Alpine to your project.
Astro Frontmatter
Astro's frontmatter is a feature that allows you to include metadata at the top of your Astro components or Markdown files. This metadata is written in a section enclosed by triple dashes (---) at the beginning of the file.
In Astro, frontmatter can be used for various purposes, such as:
Importing other components or data
Defining component props
Setting up layouts or themes for your content
Customizing content markdown via frontmatter in Astro
The projects array
This array represents a single project object within a larger collection of projects. Each object in the collection includes several key pieces of information about the project:
title: title of each projectdescription: description of each projectlink: live preview of each project.github: github repository link of each projectimage: image preview of each projecttab: category of each projecttags: technologies of each projectpriority: order of priority of each project that will be shown
{
    title: "Weather Forecast",
    description:
      "A minimalist weather forecast consuming WeatherAPI. Displays a loading skeleton and handles server errors.",
    link: "https://alvarado08.github.io/weather-app/",
    github: "https://github.com/Alvarado08/weather-app",
    image: "/projects/weather.webp",
    tab: ["featured", "personal"],
    tags: [TAGS.TYPESCRIPT, TAGS.TAILWIND],
    priority: 2,
  },
The filtered projects arrays
These arrays represent the filtered project objects by the tab array key. This is what we will we using for our x-show directive within Alpine that will determine what projects get shown for the selected tab.
Besides filtering the projects by category, we have also sorted them according to their priority key value. This way, we can have a clearer picture of the projects that will be handled and showed on each tab.
const featuredProjects = PROJECTS.filter(({ tab }) =>
  tab.includes("featured")
).sort((a, b) => a.priority - b.priority);

const freelanceProjects = PROJECTS.filter(({ tab }) =>
  tab.includes("freelance")

).sort((a, b) => a.priority - b.priority);
const personalProjects = PROJECTS.filter(({ tab }) =>
  tab.includes("personal")
).sort((a, b) => a.priority - b.priority);
Templates
In order for Alpine.js to work, we must include the x-data directive in charge of the state management of our component.
In this case, we're using a div to wrap all the content with. The directive includes:
activeTab: starting point of our tabs
activeClasses: tailwind classes for active tab
inactiveClasses: tailwind classes for inactive tabs
<div
  x-data="{ activeTab: 1, activeClasses: 'font-bold text-yellow-500/90', inactiveClasses: 'font-light', }"
>
Tabs
Our tabs container contains the tab titles, click events and class bindings that Alpine offers to conditionally assign, in this case, active and inactive classes that we have declared in our x-data directive.
<div class="flex items-center gap-5 text-xl lg:text-2xl mb-3">
    <h4
      @click="activeTab = 1"
      :class="activeTab === 1 ? activeClasses : inactiveClasses"
      class="hover:cursor-pointer"
    >
      Featured
    </h4>
    <h4
      @click="activeTab = 2"
      :class="activeTab === 2 ? activeClasses : inactiveClasses"
      class="hover:cursor-pointer"
    >
      Freelance
    </h4>
    <h4
      @click="activeTab = 3"
      :class="activeTab === 3 ? activeClasses : inactiveClasses"
      class="hover:cursor-pointer"
    >
      Personal
    </h4>
  </div>
Conditionally rendering projects
I know there's a lot going on here. Let's break it down shall we?
Project mapping: in order to go through and print out our filtered and sorted featuredProjects array, we have to map it and, in this case, we have destructured or extracted the information we are interested in from each project object
x-show: this directive dynamically shows or hides the filtered and sorted projects based on the activeTab
x-cloak: Sometimes, when you're using Alpinejs for a part of your template, there is a "blip" where you might see your uninitialized template after the page loads, but before Alpine loads.
x-cloakaddresses this scenario by hiding the element it's attached to until Alpine is fully loaded on the pagex-transitions: Alpine provides a robust transitions utility out of the box. With a few
x-transitiondirectives, you can create smooth transitions between when an element is shown or hidden
<div class="space-y-5">
</div>
{
      featuredProjects.map(
        ({ title, description, link, github, image, tags }) => (
          <article
            x-show="activeTab === 1"
            x-cloak
            x-transition:enter.duration.500ms
            x-transition:leave.duration.200ms
            class="space-y-3"
          >
            <h3 class="text-xl md:text-2xl font-semibold">{title}</h3>
            <p class="text-lg md:text-xl text-pretty">{description}</p>
            <p class="flex items-center gap-x-3">
              {link !== "" && (
                <a
                  class="inline-flex items-center gap-x-1 font-semibold text-red-500/90 text-lg"
                  href={link}
                  target="_blank"
                  rel="noopener noreferrer"
                >
                  Live
                  <LiveSiteIcon class="size-6 text-black" />
                </a>
              )}
              {github !== "" && (
                <a
                  class="inline-flex items-center gap-x-1 font-semibold text-blue-600/80 text-lg"
                  href={github}
                  target="_blank"
                  rel="noopener noreferrer"
                >
                  Code
                  <GitHubIcon class="size-6 text-black" />
                </a>
              )}
            </p>
            <ul class="flex items-center gap-3 flex-wrap">
              {tags.map((tag) => (
                <li class="flex items-center gap-x-2">
                  <tag.icon class="size-6" />
                  {tag.name}
                </li>
              ))}
            </ul>
            <img
              class="rounded shadow-md projects w-full"
              src={image}
              alt={`Preview for ${title}`}
            />
          </article>
        )
      )
    }
For the other filtered and sorted arrays, you would just need to do some copy and pasting magic and editing the x-show directive to match the activeTab.
Wrap up
And voilà! Magic right?
Hopefully I could inspire or help in someway!
I'm all ears for your feedback and comments. Happy coding!